Before we could pour we needed an inspection. They wanted to make sure we had the correct gravel, steel reinforcement, insulation, and plastic vapor barrier below the slab. The inspectors required us to spray insecticide even though the code allows for other more effective termite protection. I have been informed that the chemicals now used deteriorate, leaving the home unprotected after a few years. This is because the chemicals that take much longer to break down were getting into the groundwater where they do not break down, and so they were banned. I had hoped to rely on a barrier system that would be more safe and permanent, but I decided not to battle with this issue, to save my ammunition for bigger issues in the future.
Because I am my own contractor, the county requires that I be present during inspections. When he came, the inspector was very polite, and approved of our work if we made two changes.
He asked us to use duct tape to tape the plastic air tight to the plumbing pipes sticking up. His reason was that termites most often come through a slab around plumbing pipes. While I believe this to be true, I don't see how duct tape could stop termites. But there is another benefit of doing this. I have designed a radon venting system which will work more effectively if the vapor barrier is air tight.
Radon is a naturally occuring soil gas that can accumulate in the house. This radioactive gas is the second leading cause of lung cancer in this country. By installing a pipe from the gravel space under the slab, I can vent this gas out the roof. The slab must also be poured over a plastic vapor barrier and the concrete slab must be tightly sealed at all cracks, edges, and penetrations. This system adds very little cost to the home. If I did not build this home with a radon vent and radon was discovered after the home is done, it would cost a fortune to fix.
The inspector also wanted me to double the slab insulation. This was a suprise. I thought I was doing something extra by installing slab insulation, only to find out I had not installed enough to satisfy the inspector. Some of the laborers thought this was a waste of time, but it is not. Much of the heat of a home with concrete floors is lost through the edge of the slab, because the ground around the home gets cold in the winter. Installing panels of styrene floor insulation cost less than $50 but will save us a lot of heating and make our floors feel warmer in the winter. But there is another issue. Foam insulation on the outside edge of the wall leaves a path for termites. I solved this by using more vinyl decking between the foam and the wood. These planks are made of cedar chips and vinyl. Termites cannot stand cedar. I will also need to place a metal termite barrier in the foam insulation. By surrounding the edge of the slab with ICF walls we will have excellent insulation for the floor slab.
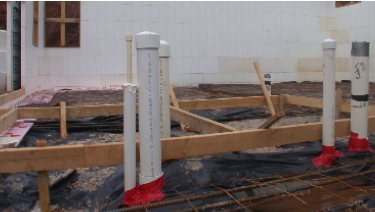
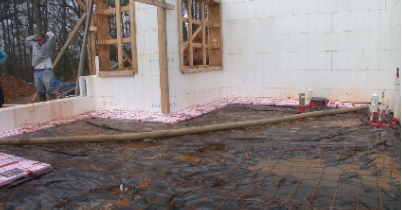
Ready to pour the slabs, with pink insulation panels around the edge,
and red duct tape sealing the pipes to the black plastic.
My design calls for using the concrete floor as the floor surface of the main level of our home.
We have picked out an acid stain to change the color of the floor.
But I was concerend with the durability of a concrete floor for a busy home and office.
I was even more concerned with cracking, as this would be exposed for all to see.
There is not as much technical knowledge of concrete in our area as in the larger cities.
That is why the quality of our concrete work has not been as good as people would like. This is now changing.
Fortunately I have a friend who worked with concrete in Florida who now has a concrete company in our area.
Brian Schmitz of Georgia Mountain Concrete helped me work up a strategy to reduce the chance of cracking.
In addition to reinforcing the concrete with glass fibers, we decided to add welded steel mesh.
He also cut lines in the slab to control any cracks that might develop.
The edges of the concrete slab are cushioned by the foam of the ICF walls
which will allow the slab to expand and contract without cracking.
Brian also reccomended 3500 PSI concrete to which we added fly ash to increase the strength even further.
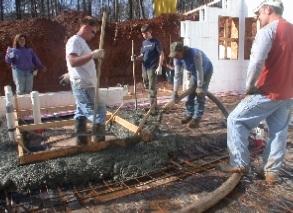
Concrete being pumped over welded wire mesh, steel reinforcement to reduce the chance of cracks.

Fly ash is a byproduct of burning coal to generate electricity. This powder adds a lot of strength to concrete.
In our area concrete plants add this to their concrete to slow down the reaction time during hot weather.
By increasing the proportion of this waste product even further, the concrete flows better.
With increased flow, less water is needed in the mix.
Less water means higher strength. The fly ash adds strength another way.
It acts like a very tiny aggregate for bonding more of the concrete molecules together.
Fly ash also slows down the curing of the concrete. The slower it cures, the stronger it gets.
Its not every day you find an idea that results in a much better product, lower cost,
and saving the environement by using a waste product.
To learn more about fly ash, see this page: ISG Resources, Inc.
To further increase the strength, we put plastic down over the newly poured slab. This prevented water from evaporating from the concrete, extending the cure time even further. We are very happy with our concrete floors.
As you can tell we missed our goal of moving into the cabin in February. When building your own home there are many delays. But the people who bought our other home were kind enough to let us rent the house for up to a year. This gave us more time, and prevented the house from being empty before they could move in.
SEE OTHER ENTRIES IN OUR HOME DIARY BY
CLICKING ON THE FOLLOWING LINKS:
(These will be updated throughout the project).
 Back to the Diary Home Page
Step 1, Purchasing the Land
Step 2, Designing Our Own Home
Step 3, Our Septic Permit
Step 4, Our Insulated Wall System
Step 5, Cutting Lumber from Our Own Trees
Step 6, Plumbing Before the Slab is Poured
Step 7, Pouring the Concrete Floors
Step 8, Pouring Concrete in the ICF Walls
Step 9, Framing the Wood Walls, Floors, and Roof
Step 10, Installing the Windows
Step 11, Roughing in Plumbing and Electrical
Step 12, Insulation
Step 13, Roofing Our Home
Step 14, Finishing the Cabin
I have friends in the construction industry who are very interested in this home. In appreciation for their assistance, I would like to give them credit for their help, and give you the opportunity to contact them. The following list will be updated regularly:
-Bonnie our helpful realtor can be contacted by EMAIL or by phoning her at 800-871-1910
-Tony of A&L Construction did the clearing, excavating, and sawed lumber from our trees. He can be reached at 828-835-9926.
-Pete is a very good part time carpenter. You can phone him at 828-479-9458.
Would you like to see this project under construction?
How to Contact The Mountain Home Show
Appreciation......
This web site contains information obtained from various sources.
The Mountain Home Show is not liable for the accuracy of this information.
Please contact the source of this information with your questions.
Come to the next Mountain Home Show, and you will get an invitation to our open house.
For more informaiton, click on the link to "Detailed information about the home show."
If you are interested in building, you may also be able to make an appointment to visit.
Click on "Email Richard" to make an appointment.
Or perhaps you would like to observe the construction of this home on line.
Click on "Construction Diary."
You are welcome to visit often as we continually update it.
How to Contact Richard C. MacCrea
 My Facebook Page
(Design news and ideas)
Email Me
(Opens an email window)
800.738.8781 P.O. Box 446, Murphy, North Carolina 28906
Other Pages on this Web Site
 The Mountain Home Show, Home Page and Site Map
(How to find what you're looking for)
The Next Mountain Home Show Program
(For guests and exhibitors)
How to Get in The Mountain Home Show
(For exhibitors)
Articles
(About designing, building and remodeling a mountain home)
The Mountain Model Home
(A home that experiments with extreme energy efficiency)
The Mountain Model Cabin
(A cabin that experiments with small size and energy efficiency)
Construction Diary
(The joys and frustrations of building these two model homes)
Home Designing and Planning
(How to get plans for building or remodeling your home)
 Email Us
(Opens an email window)
Like our Facebook Page
(Join our Mountain Home Show Community for news and contacts)
The Mountain Home Show, P.O. Box 446, Murphy, North Carolina 28906-0446
The Mountain Home Show owes its success to the businesses that participate in the show.
They arrange such wonderful exhibits.
It is obvious that they take great pride in their work and our show.